If you use AWS, you probably have a root user and one or more administrator users. If you are following best practice you have secured all logins with MFA, and you rarely if ever use the root user. Instead, you log in as one of the administrator users. The problem with that is that as long as you are logged in, you can do anything – including make disastrous mistakes. Wouldn’t it be nice to have all the power of an administrator at your fingertips, but only when you actually need it?
A quick primer on roles
Let’s say some task requires some set of permissions A, B and C.
Direct permissions are hard to manage
One solution is to give all the relevant people all the permissions they need, directly. The problem with that is that if the necessary permissions change (C is no longer needed, or D joins the party), you have to go and fix up the permissions for each and every user individually. The risk of getting it wrong is high. Someone will end up with permissions they should not have, or without permissions they need.
Groups are better
A better solution is to create a group with just the permissions needed and put all the relevant users in it (as well as in whatever other groups they need to be in). This is better (and AWS best practice) because it centralises the permissions needed. If the set of permissions needed for the task changes, you just change the group, and everyone in it gets the new permissions.
But both have another problem…
But directly assigned permissions and groups share the disadvantage that users have all their permissions all the time. They only really need the permissions A, B and C when they are working on one specific task, not for normal day-to-day activities. Having those permissions all the time increases the risk of error. The more permissions are involved, and the more powerful the permissions, the greater the risk. An administrative user has the most powerful permissions of all – and thus carries the highest risk of error.
What about a shared user?
A seductive alternative is to create a separate user with the necessary permissions for a specific task, and give the login details to anyone who needs to carry out the task. The idea is that users log out, log back in as this shared user, do what they need to do, then log out and back in as themselves. All the above problems are avoided – as long as they are logged in as the special user they have only the permissions the task needs and no more. Logged in as themselves, they have only the permissions they need for their normal activities.
Noooo!
Sounds good, but this approach has some nasty issues, too. For one thing it means you can’t tell who really did things. Regardless of which individual user did something, it will show up in your logs as being done by the shared user.
Your shared user will either have to not use MFA (making it much more vulnerable) or will have to share the MFA secret as well, making it much harder to distribute the credentials (and harder to share them between users, which is a minor plus).
Shared credentials make it difficult to manage staff changes. The only way to take the permissions away from someone is to change the password, then give the new password to everyone except the affected person. And of course you have to make sure everyone knows that they mustn’t share it with that particular person any more.
There is a risk that some users will share the credentials with people who should not have them.
In short, there is a lot that can go wrong with this arrangement. And of course it is very inconvenient for users to be logging in and out all the time.
The right way to do all this is with a role.
A role is a basically a set of permissions that users can assume. Assuming a role does not require a password, but does require that the user have permission to assume the role. Once a role is assumed, the user’s usual permissions are completely replaced by those of the role. The user can carry out whatever task needs the permissions, then drop the role. In dropping the role, the user loses all the role’s permissions, and regains all their usual ones.
AWS calls this “switching roles”. It is easy and fast to switch into and out of a role – much faster than logging in and out, because no password is required. No-one can assume a role unless they are have been given permission to do so. If someone no longer requires the role, it is simple to revoke their permission to use it.
Most importantly, whatever someone does using a role is logged against their own username. The anonymising effect of shared credentials is avoided.
Read-only administrators! What?
The rest of this article describes how to set this up for your administrator users. What we are going to do is set up a role with full administrative access, a group with read-only access but also permission to use the role, and a user in that group.
The end result is a user that by default is read-only, but that can quickly and easily acquire full administrative permissions when they are needed, and just as quickly exit back to the safety of read-only access.
To do these steps you will need full IAM permissions.
Step 1: Set up the role
- Under IAM select “Roles” at left.
- Click “Create New Role”
- Give your new role a name, “AdministratorAccess”, and click “Next Step”.
- Click the radio button beside “Role for Cross-Account Access”
- Click “Select” beside “Provide access between AWS accounts you own”.
- Enter your own 12-digit AWS account number and optionally check “Require MFA”.
- If you check “Require MFA” then the role will only be usable by people who logged in with MFA.
- Click “Next Step”
- Attach the policy “AdministratorAccess” to the role.
- Click “Next Step”
- Click “Create Role”.
Step 2: Set up a custom policy to permit the role to be used
The custom policy looks like this:
{
    "Version": "2012-10-17",
    "Statement": {
        "Effect": "Allow",
        "Action": "sts:AssumeRole",
        "Resource": "arn:aws:iam::123456789012:role/AdministratorAccess"
    }
}
That twelve-digit number should be replaced by your own AWS account number.
- Under IAM select “Policies” at left.
- Click “Create Policy”
- Click “Select” beside ” Create Your Own Policy”.
- Name the policy”AllowAdministratorAccessRole”
- Optionally provide an description (highly recommended).
- Cut and paste the above policy into the “Policy Document” field.
- Edit the 12-digit number in the policy to make it your own AWS account number.
- Click “Validate Policy” at lower right to make sure you don’t have any typos. Fix them if you do
- Click “Create Policy” to finish.
3: Create an administrators group
You may already have such a group. It is safest to create a new group, put your administrators in it, then remove them from the other group. If you modify an existing group, be sure to add all the new permissions before you remove the old ones.
If you do not have easy access to the root credentials, I suggest you set up a temporary administrator user, not in any group, for emergency use. Just in case you get this wrong 🙂
- Under IAM click “Groups” at left.
- Click “Create New Group”.
- Give your new group a name, eg “ReadOnlyWith AdministratorAccessVia Role”
- Click “Next Step” at bottom right.
- Put a checkmark to the left of these two policies:
- ReadOnlyAccess
- AllowAdministratorAccessRole
- Click “Next Step”
- Click “Create Group”.
4: Add users to the administrators group
- Under IAM select “Users” at left.
- Click on the name of the user you wish to make an administrator.
- Click on the “Groups” tab
- Add the user to the group “ReadOnlyWith AdministratorAccessVia Role”.
- Then remove all other group memberships.
- In the “Permissions” tab, remove any inline policies.
- Repeat for each administrative user
You’re done! Well, almost. You should test that your administrative users can still log in, can assume the AdministratorAccess role, and have full access when they do.
How to switch roles
Once you have successfully switched to a role, AWS will remember that you did, and will thereafter helpfully present an option in your account menu (the drop down menu that appears if you click on your logged-in name at top right of the AWS Console) to allow you to do so again, without having to resupply all the details mentioned below.
Now read on 🙂
A user that wants to use the AdministratorAccess role just has to click a link that looks like this (YOURACCOUNT is your twelve-digit AWS account number or account alias):
https://signin.aws.amazon.com/switchrole?account=YOURACCOUNT&roleName=AdministratorAccess
then click “Switch Role” and they will be an administrator.

Of course, they have to be in the “Administrators” group, and if you ticked “Require MFA” when creating the role, they also have to have logged in using MFA.
If they don’t have the link bookmarked, they can do it the hard way, and click on their account name at top right, select “Switch Role” from the account menu…
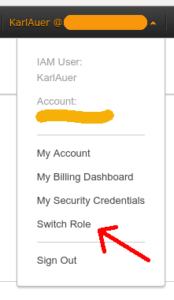
… then provide the 12-digit account number and the name of the role:
![]()
It’s a lot quicker to have it prefilled via a bookmark 🙂
Also, if you have read access to roles in the IAM console, you can click on any role in the list of roles to see the link for that role helpfully displayed. This may be less useful for general users, but it makes it easy for administrators to send people the links they need. And as noted above, once a user has successfully assumed a role, they will have a quick and easy clickable option for that role in their account menu.
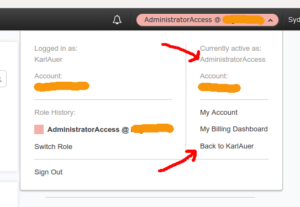
When switched to a role, the account name at upper right shows the rolename and is a different colour:

When they have finished doing whatever it was that needed doing as an administrator (or in any other role), the user clicks on their account name at top right, selects “Back to <their_user_name>” and they will be back to their default access. In the example we have been developing, that is read-only access:
The end result is a much safer AWS administrator.
There is a lot more to roles than we have covered here. This example is a bit all-or-nothing, but you can use this technique to provide as many or as few privileges as you like; you can make it as fine-grained as you wish.
I highly recommend reading the AWS online documents to see what’s possible.